Beginner
How to Take Progress Photos: A Step-by-Step Guide
Progress photos are one of the most motivating and informative tracking tools available. A side-by-side comparison of week 1 and week 12 tells you things the scale simply can't. The challenge is taking them consistently enough to make meaningful comparisons. This guide gives you the exact protocol.
Why Consistency Is Everything
A progress photo is only useful if it can be fairly compared to another photo taken at a different time. If lighting, angle, time of day, and pose change between photos, you can't tell whether differences in appearance are due to actual body composition changes or just photographic variables.
Two well-matched photos a month apart reveal more than 20 carelessly taken daily selfies.
The Protocol
When to Take Them
Morning, immediately after waking and using the toilet, before food or water.
This removes daily variation from:
- Food volume in the stomach
- Water intake
- Glycogen loading from meals
- Post-training pump
Your morning physique represents your "baseline" composition most accurately.
How Often
Weekly during an active, short cut (8–12 weeks). Fortnightly during a longer, more gradual cut.
Daily photos add noise without additional information. Longer intervals mean you miss progress and reduce motivation.
The Location Setup
Pick a spot and stick to it. Ideally:
- Same wall or background (plain is better)
- Same distance from the phone (lean it against something, use the timer, or use a tripod)
- Same light source — a window with natural light, same side of the room
Avoid: overhead bathroom lights (harsh shadows), backlighting (silhouettes you), dim lighting (hides definition), or changing rooms (you'll never replicate the exact conditions).
Clothing
Minimal and consistent. Wear the same item(s) each time — shorts and no top for men, sports bra and shorts for women is standard. Wearing different swimwear, shorts, or tops between photos makes comparisons harder and less reliable.
This isn't about aesthetics. It's about being able to see your body clearly across consistent conditions.
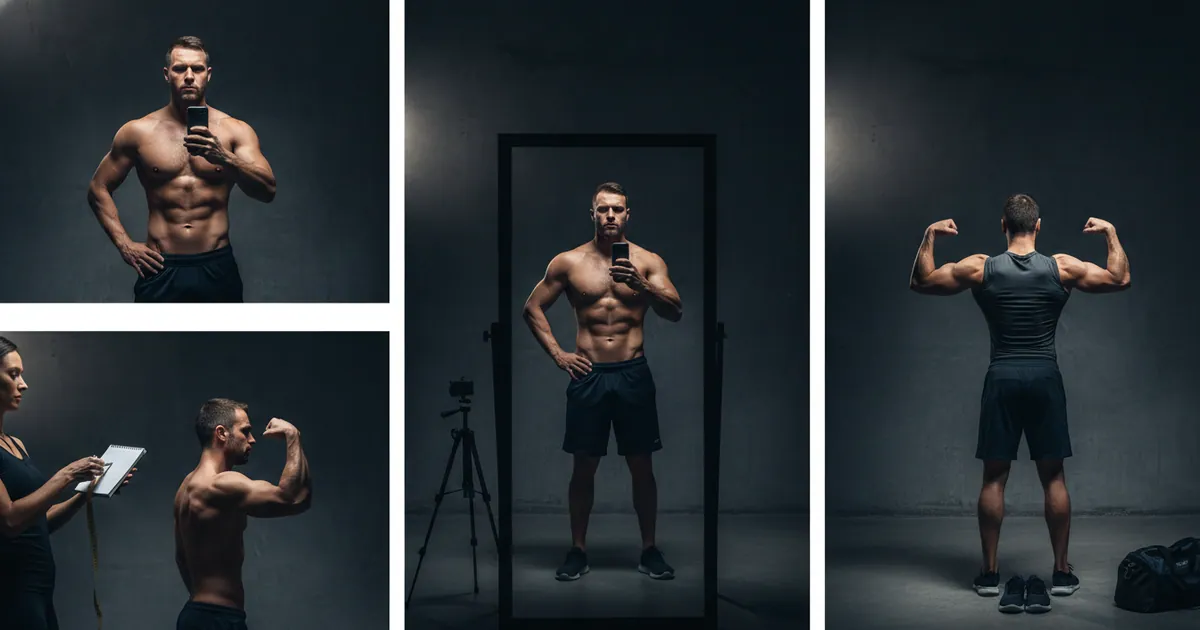
The Standard Poses
Use all three each session. Take a few shots of each to find the best one.
1. Front Relaxed
Stand with feet shoulder-width apart, arms slightly away from your sides (so they're not compressing your torso). Look straight at the camera. Relax — no posing, no flex.
This shows: overall frame, waist width, shoulder-to-hip ratio, leg size, and front abdominal development.
2. Side Relaxed (90 degrees)
Turn to face the side. Feet shoulder-width, arms in front of your body or hanging naturally. Don't arch your back or tuck your stomach. This is the hardest pose to fake — posture issues and midsection fat show clearly here.
This shows: belly and love handle progress, chest/back depth, overall silhouette.
3. Rear Relaxed
Face away from the camera, same relaxed stance. This is one most people skip — which is why it's worth doing. Back development and glute changes are very visible here.
Optional: Add a flexed front double bicep pose or side chest if you want to track muscle development specifically.
Pro Tip
Set a recurring alarm on your phone for the same morning each week, labelled "Progress Photos." When it fires, go take the photos immediately. The main reason photo routines fail is postponing them — "I'll do it when I look better" delays the process indefinitely.
Storage and Review
Create a dedicated folder (phone gallery, Google Photos, or a dedicated app like Progress — Body Journal). Name files by date for easy chronological browsing.
Review photos side-by-side every 4 weeks — not every week. Comparing week 1 and week 2 often shows too little change to be motivating. Week 1 vs. week 4 typically shows meaningful progress that confirms the effort is working.
The Psychological Challenge
Taking photos of your body during a cut is uncomfortable for many people, especially at the start. The "before" photos feel unflattering. Take them anyway.
In 12 weeks, those photos will be your most powerful source of motivation — and evidence that what you're doing works.
Warning
Keep progress photos private unless you actively choose to share them. Don't let the existence of the photos create pressure to share with anyone — they're a tool for you, not an obligation to an audience.
Myprotein Impact Whey
The UK's best-selling protein powder. 21g protein per scoop, under 50p per serving on sale.
Affiliate link. See our disclosure.
Key Takeaways
- Consistency in lighting, timing, location, and poses makes photos comparable and meaningful
- Morning before food is the standard; same time of day removes daily variation
- Three standard poses: front relaxed, side relaxed, rear relaxed
- Weekly during active cuts; fortnightly during gradual ones
- Compare every 4 weeks, not every week — monthly comparisons show meaningful progress
Newsletter
Cut smarter, every Sunday
One deep-dive guide, one recipe, one tip. No spam. No bro-science. Unsubscribe anytime.
More like this
Related guides

Beginner
Quick Workout for Busy People — 10 Minutes to Results
5 min read

Beginner
Beginner Workout for Weight Loss — Start Your Fitness Journey
5 min read

Beginner
How to Use a Food Scale: The Beginner's Guide to Accurate Tracking
5 min read
Beginner
Gym vs Home Training: Which Is Better for a Cut?
6 min read